
ESPHome room presence detection with Format-BLE Tracker
Room-based location detection lets your smart home know exactly who is in what room, which you can use to trigger bespoke automations. For example, depending on who is in a room and their preferences, you could automatically show different photographs on a smart display, play different music on the smart speakers, or set the thermostat to a person's preferred temperature.
In my previous smart home I used a platform called ESPresense, which used ESP devices to sniff out the Bluetooth addresses of my and my partners mobile phones. The phones were configured to transmit Bluetooth Low Energy (BLE) beacons at regular intervals, which ESPresence would listen out for. Based on the signal strength of each of these BLE beacons it could roughly determine which phone, and therefore which person, was in each room.
This worked great, but it had one major drawback: I had to dedicate a whole ESP32 device to running ESPresense. I use ESP32 devices all over my home to do various jobs, and these run ESPHome. I have Everything Presence One’s and Lites doing presence detection, I have an ESP32 bed sensor that detects if we’re in bed, and I’d like to be able to use these existing ESPHome devices to do the tracking alongside whatever other job they’re already doing.
Thankfully, you can achieve this using Format-BLE. Format-BLE-Tracker is a HACS integration that lets you use some ESPHome code to set up tracker nodes that you can place in each room. I’ve been using it for over a year now and it’s been working great.
To use this in your smart home you will need:
Home Assistant with HACS installed
MQTT configured for Home Assistant
Some ESP32 devices that have Bluetooth support
The Home Assistant companion app installed on your Android phone or some sort of other Bluetooth beacon.
Installing the Format-BLE-Tracker integration
Format-BLE-Tracker is a HACS integration. You can install it by following by either using this button

Or by the instructions on the Format-BLE-Tracker GitHub page, which are:
Go to HACS
Go to Integrations
Click the kebab menu (That’s the three dots menu in the top right hand side)
Click on Custom Repositories

Paste the URL of the GitHub repository into the box, select Integration from the Category dropdown and click Add. The URL is https://github.com/formatBCE/Format-BLE-Tracker

You should now be able to install the integration from the HACS Integrations page. If it’s not listed, press refresh or clear your cache.
Creating an ESP32 Tracker Node
Now that we have the integration installed, we can create our first ESP32 tracker node. For this you’ll need an ESP32 device and a USB data cable. I really like these M5 Stack Atom developer modules, because they come inside a case and are relatively affordable.

Plug it into your computer and go to https://web.esphome.io in either Chrome or Edge.
Click the Connect button and select the right device in the serial port popup.

Once it’s connected, click the Prepare for First Use link to install the default ESPHome firmware to the device.


When it's finished installing, you can use this link to connect it to your home Wifi network. Be aware that this usually needs to be a 2.4Ghz Wifi network.
Once you’ve connected it to your Wifi network it will hopefully be autodiscovered in your ESPHome dashboard. Click Adopt to bring it into your console so you can manage it and update the code.

Click the Edit button under the device you just imported so that we can add the Format-BLE Tracker code into the default code.

We’ll now need to add a few lines of code to the bottom of the existing ESPHome code
Make sure to replace your Room Name and MQTT details with the right ones for your setup.
mqtt:
  broker: <MQTT SERVER>
  username: <MQTT USERNAME>
  password: <MQTT PASSWORD>
  discovery: true

# Adding external component to build:
external_components:
  source: github://formatBCE/ESP32_BLE_presense@main

# System time config - required for precise timestamps, used in integration:
time:
  - platform: homeassistant
    id: homeassistant_time

# Initializing it:
esp32_ble_presense:
  area: "<YOUR ROOM NAME>" # Replace this with your room name
  time_id: homeassistant_time
And finally, find these lines of code and remove them.
# Sets up Bluetooth LE (Only on ESP32) to allow the user
# to provision wifi credentials to the device.
esp32_improv:
  authorizer: none
If you don’t, you will receive an error that says error: expected type-specifier

error: expected type-specifier when trying to use Format-BLE Tracker with ESPHome
You should now be able to install this new code to your ESP device by clicking the Install button on the top right. If everything worked correctly it should upload the firmware and you should see your BLE Tracker starting to report new devices seen nearby.

Now you can take this ESP32 device and plug it in somewhere near the center of the room you want to track presence in.
You can do follow these instructions again and again with other ESP devices until you have one in each room you want to track.
Lastly, you need to set up some BLE transmitters to track.
Home Assistant Companion App BLE Transmitter on Android
Like most people these days, I tend to have my mobile phone on me (or near me) at all times. It’s pretty reliable that I’ll be in whatever room my phone is in, especially for most use cases. The same goes for my partner.
We both have Android mobile phones, and we both have the Home Assistant app installed on them. This app can act as a Bluetooth Low Energy transmitter, which can be detected by your ESPHome Tracker nodes to determine what room the phone is in.
To turn on this tracking, open up the Home Assistant mobile app.
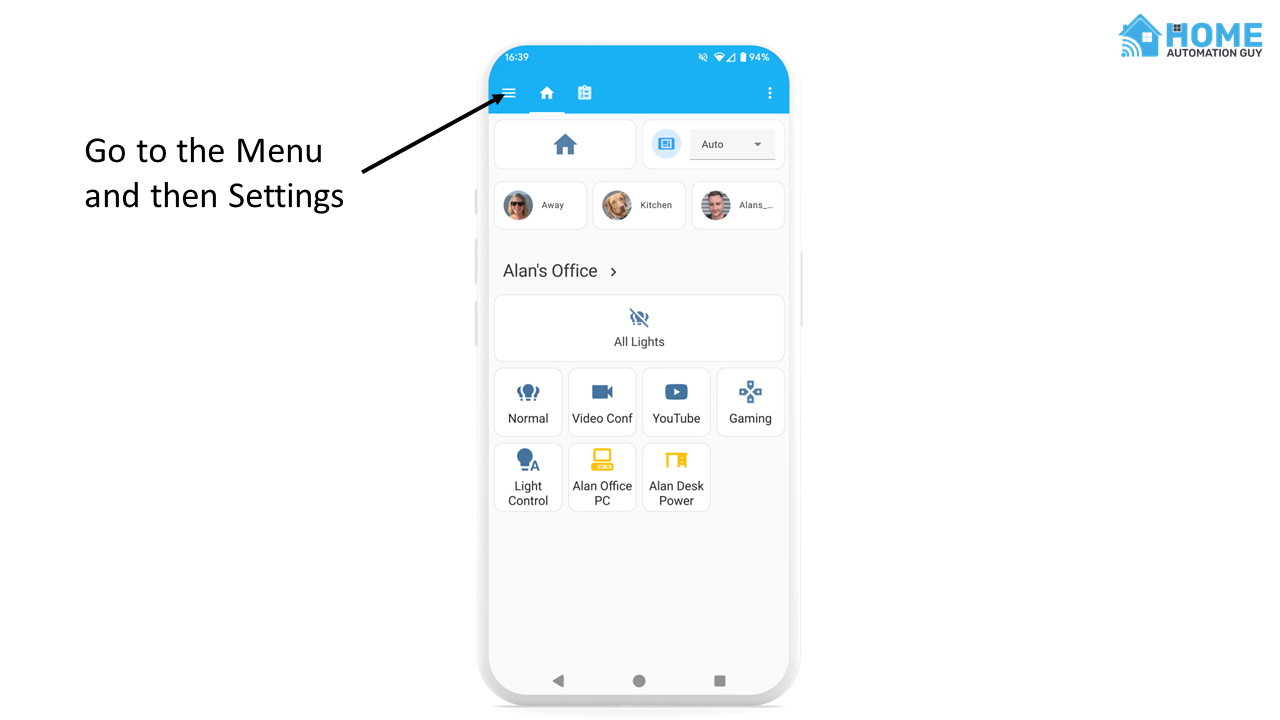
Go to the Menu, and then Settings

Go to Companion App Settings and then Manage Sensors.
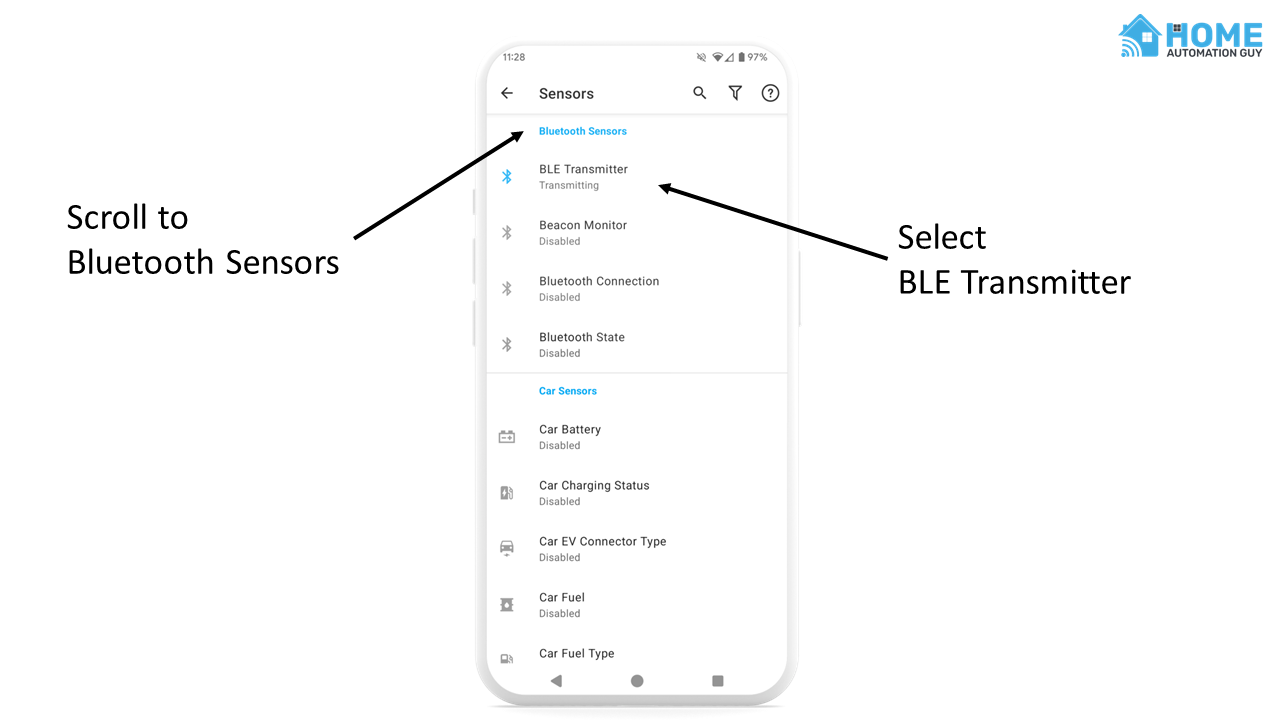
Open the Bluetooth BLE Transmitter sensor

Enable the BLE Transmitter sensor
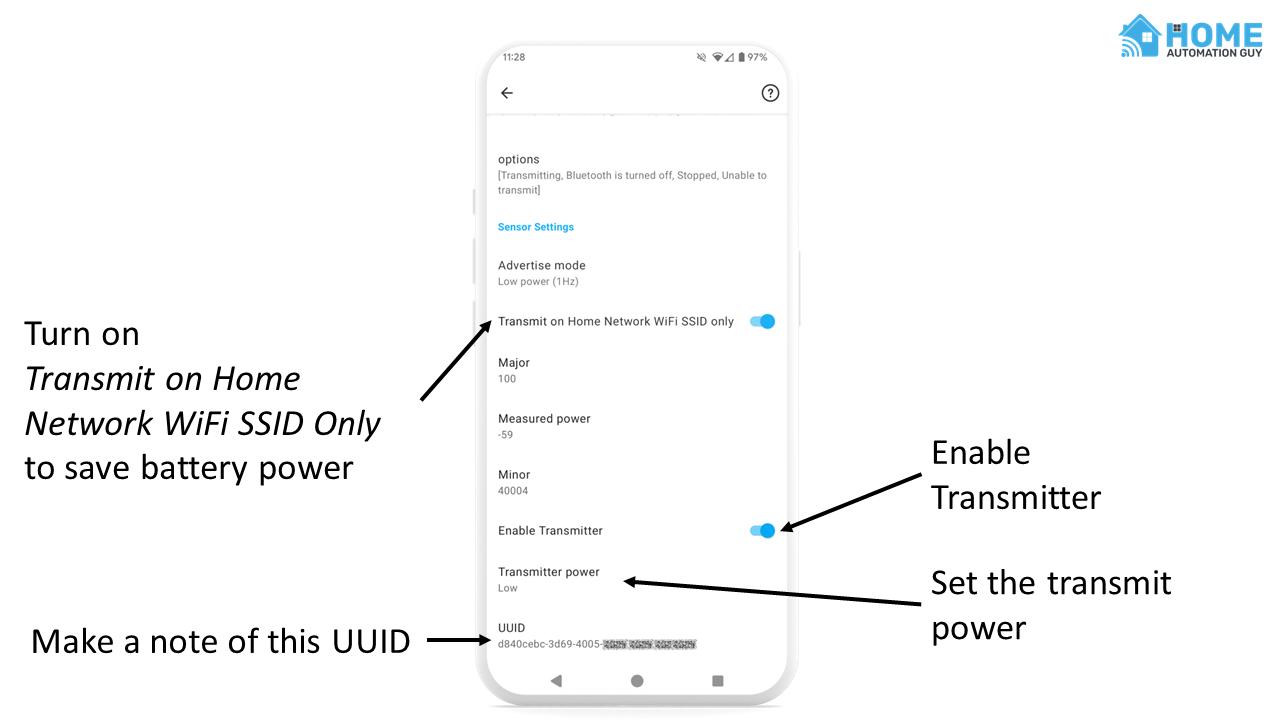
Turn on the transmitter and ensure it only transmits when you’re connected to your home WiFi.
Then make a note of the UUID of this transmitter, you will need it later.
BLE Beacon Tags
You can track the location of other objects, such as keys or pets, using BLE beacons like this one I bought on Amazon.

I really like its small size, the fact that it is waterproof, and that you can replace the battery when you need to. So many of these beacons don’t have replaceable batteries which I find terrible from an eWaste point of view.
This is roughly the same size as an Apple AirTag, and I’ve managed to put it on my dog's collar with a silicon tag holder that fits on the collar.


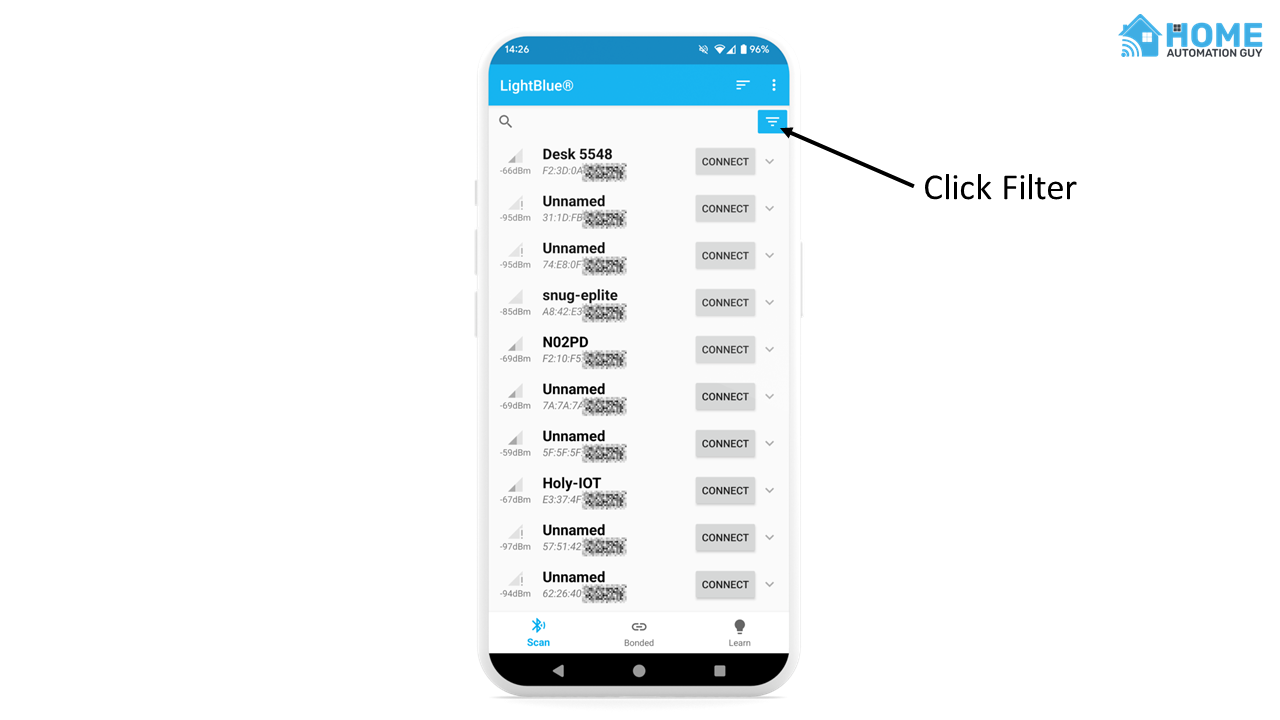
To track this beacon you’ll need to put a battery into it and use a BLE scanning app to find the MAC address of the tag itself. I use an Android app called LightBlue.
Open the LightBlue app and it will scan for all BLE devices nearby, and show you their signal strength in dBm. Higher the number (So -80 is lower than -40), the closer the beacon is to your phone.
You can use the filter tool to filter out weaker signals so the list is easier to navigate.

I find a filter of -70dBm works well for me.
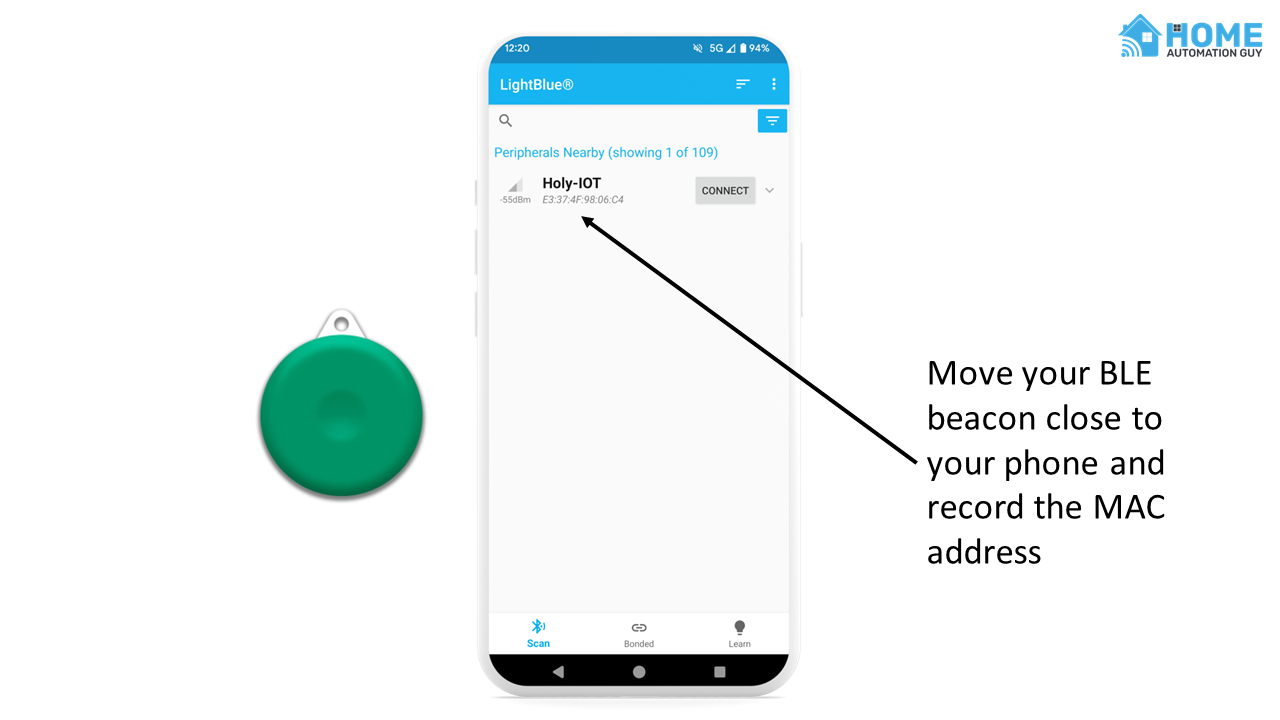
Now move your beacon close to your phone, and record the MAC address of it. You’ll need it later.
Tracking the devices in Home Assistant using Format-BLE Tracker
Now that you have all your parts and items set up, you can start tracking the Home Assistant mobile app beacon, or the BLE tags, inside Home Assistant.

Home Assistant dashboard showing room presence.
To add your first location tracker, go to the Home Assistant Integrations page, click the Add Integration button, and search for the Format-BLE Tracker integration that you added via HACS earlier.
Add a new beacon
Now type the UUID of your Android Home Assistant App BLE transmitter, or the MAC Address of your BLE Beacon Tag into the box, give it a name, and press Submit.
You should now have a new Home Assistant device with the name you specified. If you put that BLE beacon or device near one of your ESP32 room tracker devices the Current room entity should reflect the room it is detected in.

Format BLE Tracker device in Home Assistant showing the Current room it is detected in.
I highly recommend changing the name and entityID of your sensor entities to reflect the person or object you’re actually tracking, because the default is the UUID or MAC address and makes it a bit difficult to find when using in your automations.

You can also play with the Exipiration Delay and Minimum RSSI slider controls to more accurately detect the devices in the right rooms.
Expiration Delay: This will affect the time from time it is detected in a room until it considers the device to be Away from your home. If your device often changes Home to Away and back, change this to a higher number. By default set to 2 minutes.

Minimum RSSI: If the signal strength is below the value you set in this slider, it will be ignored by the ESP32 Tracker node. I have an ESP32 tracker node in most rooms and my rooms aren’t that big, and I found setting this to -90 worked best for me. You will need to play with this to find out what works best in your environment.

Once you have everything dialed in, you should be able to see the entity changing as you move from room to room!

Bonus Tip: Template sensor that combines room and Device Tracker presence
The problem with the Format-BLE sensor is that it switches to an Unknown state when it can’t detect what room you’re in, such as when you leave the house. To detect if I’m home or away I use a Device Tracker, which meant I ended up with two sensors for tracking myself. The BLE sensor for the room, and the device tracker for home or away.
I combined these into a single Template sensor, which I added to my configuration.yaml file, that shows the room I’m in if it knows, or the Home/Away status in case it doesn’t. This means I can put one clean sensor on my dashboards that shows if I’m away or home, and if I’m home the room I’m in.
template:
  - sensor:
      - unique_id: "alan_location"
        attributes:
          friendly_name: "Alan's Location"
          entity_picture: "/local/img/alan.jpg"
        state: >-
            {% if states('sensor.heather_current_room') != 'unknown' and states('sensor.heather_current_room') != 'unavailable'%}
              {{ states('sensor.heather_current_room') }}
            {% else %}
              {{ states('person.heather').replace('not_home', 'Away').title() }}
            {% endif %}